Posts tagged gift
FREE PRINTABLE EID GIFT WRAP & TAGS
eid_gift_wrap_atelierliving
 

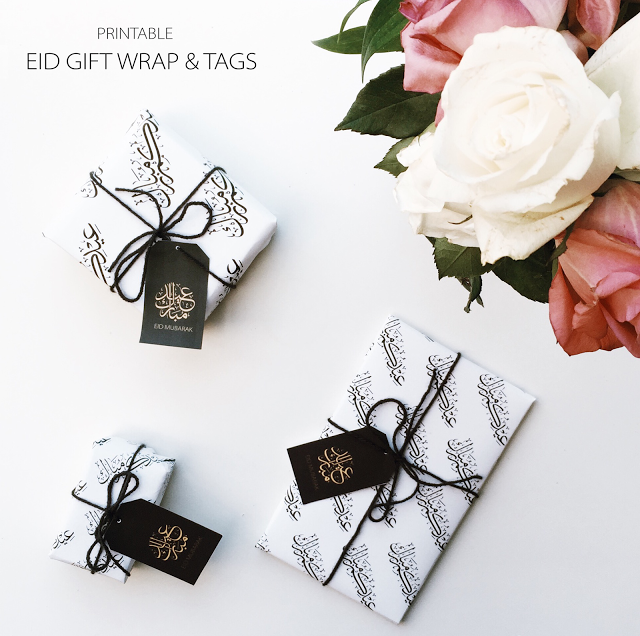
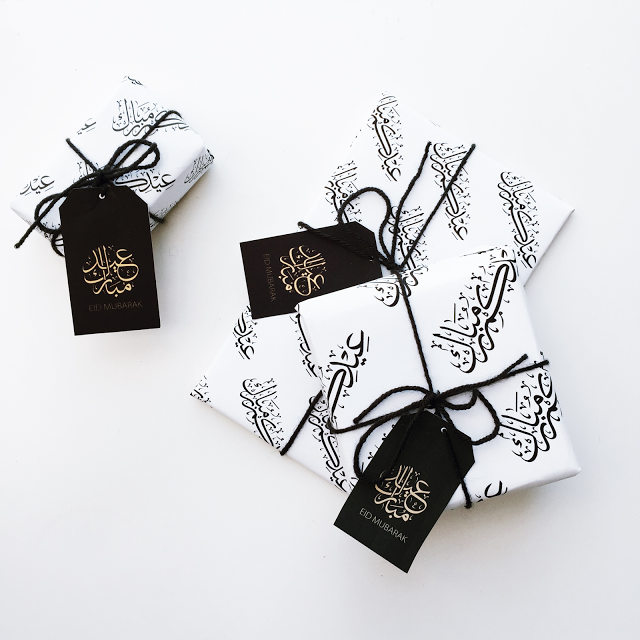
With Eid being less than a week away, I made some Arabic calligraphy printable gift wrap to add a touch of je ne sais qoui to your gifts. Simply just print the gift wrap to the desired paper size you want (max paper size is A3) and wrap it up.

For the wrapping paper I would recommend using copy paper, as card will be much harder to wrap with. Having said this, the gift tags would work best if printed on card.

Here's a little gift from me to you to get us in the festive spirit. A great affordable and easy way to add that special touch to your Eid gifts and it also comes in handy for last minute gift wrapping.

I am really pleased with how they have turned out and hope you all will enjoy them as much as I have enjoyed designing them. I wish you all (if you celebrate that is) an Eid full of love and happiness. May your prayers be accepted in the last few days of Ramadan and may He bestow His grace and mercy on as all and brighten up our paths Inshallah.

 
eid_gift_wrap01_atelierliving
eid_gift_wrap02_ateleirliving

D O W N L O A D    L I N K S

Arabic Calligraphy Wrapping Paper

Eid Gift Tags

Printable gift wrap and tags is for personal use only, and NOT for redistribution

If you would like to post a link sharing them, you may not directly post the downloadable files.

Please credit and link back to this post for downloading.

Stay gold

Amni x


D I Y - CREATE YOUR OWN ART PRINTS USING PHOTOSHOP CC
 photo IMG_5824_zpsgh7cffgs.png

If you've been following me on Instagram, I recently posted up a picture of my new workspace. I created my own art prints to 'pimp' my desk area because honestly who doesn't like something pretty to look at whilst slaving away at work? ahaha. So I thought I'd share with you all how to make your own prints in Photoshop CC.

This is a super easy tutorial and is great for beginners + its fun!

No but seriously, I got you on this one.

HOW IT'S DONE:

1. Download a font of your choice which you wish to use for your print. (I'm using this one)

2. Open up Photoshop CC and set your paper size. (File > New > Photo > and then whatever photo size/orientation you want. (I'm using portrait 2x3)

3. Choose a background colour.

Think about what background you would want your text to lay on. My theme for this print is black and white. I love the look of a crisp contrast as a print but thats just my personal preference. Whatever colour you choose to use is entirely up to you. Have fun and explore different looks with this tutorial.

4. Write out your text.

Again the font that you use is entirely up to you and it all depends on the style of print your trying to achieve. For this specific print Im using - Painted

Play around with your font size and placement until you are happy with the final result.

And there you have it. Your own art print ready for your wall!

Didn't I tell you I got you? ahaha

Did you enjoy this tutorial? If so, share it around with your friends and family who might find this useful. They're a great way to add some decor to any room or perhaps you could use them as a small gift during the holidays or for special occasions.

If you want to see more quick and easy DIY's like these leave a comment below of any suggestions you may have. I love hearing from my followers.

Stay gold

xo